Com Port: 시스템에 의해 생성된 것 선택
Baud: 57600 bps 선택
Data Bits: none선택
Parity: 1 선택
Stop Bit: 0 선택
Flow Control: none 선택
Connecting the USB-ProxSonar-EZ
1. Download a terminal program
2. Unzip to a location of your choice
3. Connect USB-ProxSonar-EZ ultrasonic proximity sensor to a computer with a Micro-B USB Cable
Windows will automatically configure drivers, may take several minutes
3. Run the terminal program .exe file
The terminal program .exe file should look for the first available sensor and connect. IF this does not
occur, configure the above serial setting.
4. Advanced user setup can be seen below
Troubleshooting Connectivity
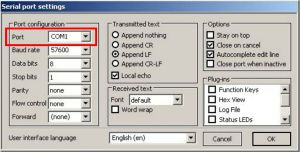
If the software does not find the USB-ProxSonar-EZ automatically, simply click on "SETTINGS" and change the "Port" menu. The communication port number should match the com port assigned to your computer by windows. After changing the "Port" menu click OK. None of the other settings need to be changed.

To connect or disconnect the COM port click the button shown.
Multiple Sensor Operation
1. Open a second terminal window
2. Click settings
3. Change port to match the newest COM#
4. Configure the COM port settings to the required values in the chart on the top of this page
5. Click ok
Terminal Software Setup
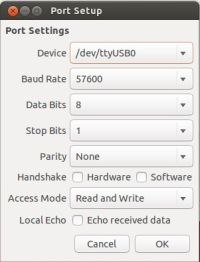
This was created with Ubuntu 12.10 and the software used is MoSerial.
1. Download and install a terminal program
2. Configure port
a. Click "Port Setup"
b. Set "Device" menu to "/dev/ttyUSB0"
c. Set Baud Rate to 57600
d. Set Data Bits to 8
e. Set Stop Bits to 1
f. Set Parity to none
g. Turn off all "Handshakes"
h. Setup should match image on the right
3. Click "Connect"
4. Click tab that says "Received ASCII"
5. Advanced user settings is available
Terminal Program Setup
1. Download terminal program
2. Configure terminal program
3. Select "Settings" menu
4. Select "Modem Preferences" option
5. Select "usbserial0"
the zero may change depending on hardware configuration
6. Set the following options
a. Set "Data Rate" to 57600
b. Set "Data Bits" to 8
c. Set "Parity" to None or 0
d. set "Stop Bits" to 1
7.Remove check boxes from "Flow Control" options
8. The "Service Name" can be named at the user's preference
9. "Phone Number", "Pre-dial init", and "Password" options can be left blank

Please be aware that we have not evaluated Zterm for operation with the USB‑ProxSonar‑EZ. If you have a preferred terminal software, it can be configured with the same settings of Zterm
Computer USB ports have latency and buffer sizes which can change the time between the range readings reported by the USB‑ProxSonar‑EZ ultrasonic proximity sensors. This time delay can be caused by the USB hardware on the computer's system board, the chipset managing USB communication ports, the age of the computer hardware, the number of devices using USB communication, and by the computers operating system.
When multiple USB connections are working in parallel, such as a mouse, keyboard, and flash-drive, the bandwidth is shared among the devices. When bandwidth is shared between devices, the buffer and latency is increased due to the extra demand of resources from the computer chipset.
The following direction sets are how to help lower the latency of the USB port in the computer's operating system
Windows Users
For advanced Windows users, this instruction set will allow the use of a low-latency mode of operation for the USB‑ProxSonar‑EZ.
1. Open "Device Manager"
2. Expand the "Ports (COM & LPT)" menu
3. Select the COM port that is assigned to the USB‑ProxSonar‑EZ
4. Right click on the COM port and go down to "Properties" on the new menu
5. On the Communications Port Properties window select the "Port Settings" Tab
6. Click on the option that says "Advanced"
7. Set the "Recieve (Bytes)" option to 512
8. Set the "Transmit (Bytes)" option to 512
9. Set the "Latency Timer (msec)" option to 2
10. The "Serial Enumerator" option should be checked.
This setting makes Windows remember the COM port assigned to the Device
When this is unchecked, Windows will assign it the first available Com Port
A screenshot of what the Advanced Communications Port Properties window should look like after configuration can be seen like this. http://www.maxbotix.com/pictures/articles/059-AWin.jpg
Linux Users
For advanced Linux users that wish to operate in low-latency with the USB‑ProxSonar‑EZ please use the following directions. While operating in low-latency mode, the USB buffer delay will be reduced to 128mS at most.
1. Open xTerm window
2. Type the following command: $ dmesg | grep FTDI.
a line that looks like "/dev/ttyUSB#" will be output
3. enter the following command. $ setserial /dev/ttyUSB# -g.
The # sign will be the USB port assigned to the USB‑ProxSonar‑EZ sensor.
Information will be output that looks like"/dev/ttyUSB#, UART: unk, PORT:0X0000, IRQ:0".
4. Enter the low latency command: $ setserial /dev/ttyUSB# low_latency.
This command will set the USB‑ProxSonar‑EZ into low-latency mode.
It is recommended that the configuration is confirmed.
5. Enter the command $ setserial /dev/ttyUSB# -g.
The low-latency flag should be appended as follows:
"/dev/ttyUSB#, UART: unk, PORT: 0X0000, IRQ: 0, Flags: low_latency".
 오늘하루 열지않기


관리자에게만 댓글 작성 권한이 있습니다.