


 수량을 선택해주세요.


FM 무선 트랜스미터 모듈 -마이크로폰, 50Hz-18Khz
(FM Wireless Transmitter Module -Microphone)

개요
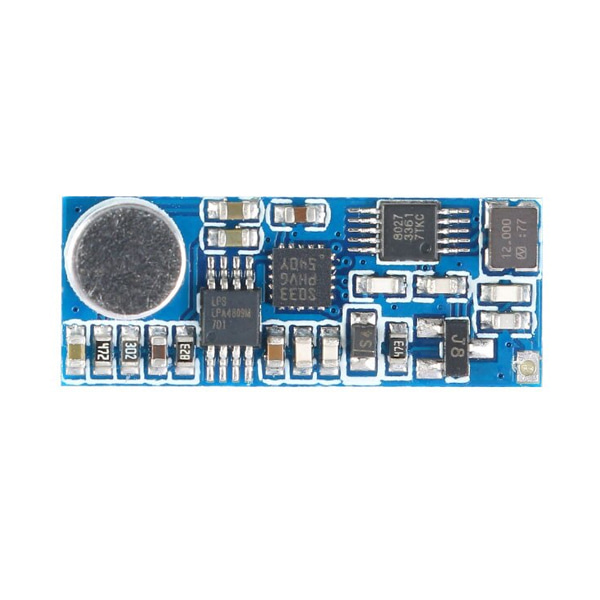
- 본 제품은 FM 무선 트랜스미터 모듈 -마이크로폰입니다.
- 마이크로폰을 장착하였으며, 100mW의 파워를 가지고 있습니다.
- 50Hz-18Khz 주파수 대역에서 사용이 가능합니다.
- 모노 채널로 3.3V/5V 전원으로 동작합니다.
- 75cm 길이의 막대 안테나와 연결하여 사용이 가능하며, 대략 100미터가량의 통신거리를 가집니다(주위환경에 따라 통신거리는 영향을 받을 수 있음)
- 보드 뒷면의 UART 포트를 통해서 AT명령을 주어 주파수 설정이 가능합니다.
- 3.7V 리포배터리를 연결하여 사용할 수 있습니다.
특징
- Output power: 100mW
- Audio frequency response range: 50Hz-18KHz
- Transmitting frequency: 76.0MHz-108.0MHz (configure the transmitting frequency through the computer host computer)
- Modulation mode: standard FM
- Channel: mono
- Supply voltage: DC 3.0V-5.0V
- Working current: 35mA
- Transmitting antenna: 75cm rod antenna
- Emission distance: The FM transmitter module is connected to a 75cm standard rod antenna, and the radio is equipped with Desheng PL-660. The open cover is covered with a radius of 100 meters. (Note: The launch distance is for reference only, due to the difference in usage environment)
문서
-
Instructions for use:1.Power supplyThe back of the module corresponds to the port GND, 3.7V is connected to the negative and positive terminals of the power supply (battery), and the power supply is recommended to use the battery or the transformer buck regulator. Switching power supplies without filters (such as mobile phone chargers, charging treasures, and on-off DC-DC power supplies) cannot be used. Otherwise, high-frequency interference generated by the power supply unit may affect the normal operation of this module. The normal working voltage of this module is 3.0-5.0V, and the power supply voltage should not exceed this range.2.AntennaThe ANT port is used to connect the FM antenna. In order to transmit the FM signal better, it is recommended to connect the rod antenna with a length of 75cm, and there is no obstacle blocking near the antenna.3. Frequency adjustmentThis module needs to configure its transmission frequency point with the computer (refer to the frequency configuration method in the lower part of the details page for details).Precautions:1. Please confirm that the power polarity and power supply voltage are correct and then power on. If the voltage input exceeds 5V or the positive and negative poles of the power supply are reversed, the module may be permanently damaged.2. The hand cannot touch the back component of the module during work, so as not to affect the normal operation of the module.Frequency configuration method and steps:1.Connection method of USB to TTL module and this module(1) Connect the GND, RXD, TXD, and 5V ports of the USB to TTL module to the GND, TX, RX, and VCC of this module respectively.2. Install the USB to TTL serial module driver1. Install CH341SER-V3.3 [2012.02] .EXE in the driver folder of CH341SER-V3.3USB to serial port module2. Pop-up point installation3. Wait-installation is successful(2) Connect the USB-to-serial port module and the module and insert the USB-to-serial port module into the computer, wait for the automatic installation of the driver. After the automatic installation is complete, open the device manager and check the serial number corresponding to the USB-to-TTL module3. Install the serial port configuration tool Serial port tools V1.2, directly open the installation project in the folder and install by default.(1) After the installation is complete, click Serial Port tools V1.2 on the desktop to open the serial port configuration tool.(2) Select the port of our USB to TTL module, click COM6 to open the serial port, you can set the frequency of the module in the tool, enter a frequency in the frequency setting input box (before 76.0-108.0) and click single write The following shows that the writing is successful. Of course, you can not use this tool to set it. You can refer to the tool's instructions in other ways and send the AT command to have the same effect.(3) You can also read the frequency and version of the module through this tool, and click the "Read" button to return the current frequency and version information of the module.
Modify the microphone pickup sensitivity description:
This module can change the pickup sensitivity of the microphone by modifying the negative feedback resistance of the microphone preamplifier circuit to meet the individual user's adaptation to special sensitivity requirements. The default value of the negative feedback resistor of the microphone preamplifier is 82K ohms. Increasing the sensitivity of this resistor microphone increases, and the sensitivity of the microphone is reduced. - To adjust the frequency, you need a USB-TTL converter. When connecting, according to the description, the terminal program uses two commands: one reads to view the frequency configured earlier and shows the version of the device: at + RET and the second program the necessary frequency: at + FRE = 1074 where 1074 is 107,4 MHz for example