


 수량을 선택해주세요.


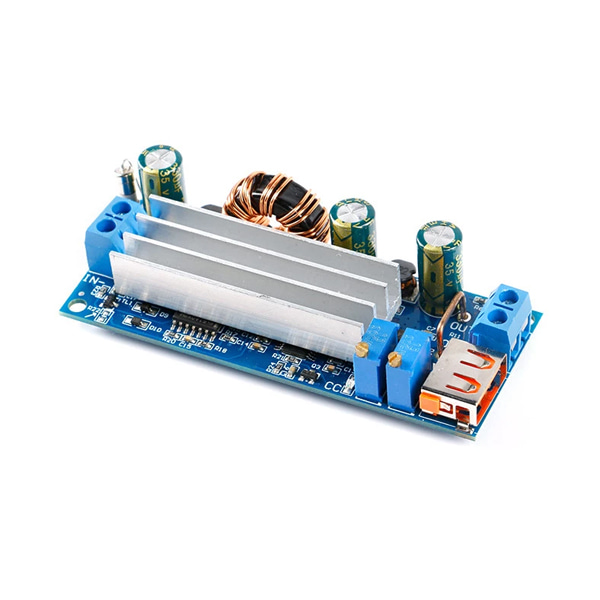
조절가능 DC-DC 스텝업 컨버터 -80W, 3-30V
(DC-DC Step Up Converter -80W, 3-30V)
개요
- 본 제품은 조절가능 DC-DC 스텝업 컨버터 -80W, 3-30V 입니다.
- 2-24V를 입력 받아 조절가능한 3-30V의 출력(80W)를 내보내는 제품입니다.
- 최대 입력 전류는 15A이고 최대 출력 전류는 4A입니다. 입력 전압이 3.7V일때 출력은 45W에 이르며, 입력이 12V일때 출력은 80W에 이릅니다.
- 역극 보호, 과전류 보호, 저전압 보호, 역전류 출력 방지 등의 기능을 가지고 있습니다.
특징
-
Input voltage: 2 ~ 24V
Output voltage: 3 ~ 30V. Note that the USB port is directly connected to the output port. It is an adjustable voltage port 3-30V, not a 5V port!
Input current: Maximum 15A
Output current: Maximum 4A (CC point potentiometer is a current-limiting adjustment potentiometer. When the limit current is reached, the CC indicator light is on and enters the constant current mode; BOOST boost structure, adjust the limit current and can not directly short the output terminal, you can adjust it counterclockwise first To the minimum, turn clockwise to increase the current after connecting the battery)
Output power: under 3.7V input, the maximum power is 45W; under 12V input, the maximum power is 80W;
Output ripple: dual-stage filtering, low ripple output!
Conversion efficiency: 82~95%
Input overcurrent protection: 15A fuse
Input anti-reverse protection: high efficiency MOS type
Input undervoltage protection: If you need to prevent the lithium battery from over-discharging, please weld a 5.6k resistance at R22 at the lower left corner of the module. It will start when it is higher than 3.5V and stop when it is lower than 3V. The factory defaults to work at 2V voltage. If you need other levels of undervoltage protection threshold, you can calculate it yourself or contact customer service. The calculation formula is R22=12500/(U-0.75v) ohm, where U is the desired undervoltage protection threshold voltage (stop Voltage).
Note:
1. BOOST boost structure, adjust the current limit and can not directly short-circuit the output terminal. You can first adjust the CC potentiometer to the minimum counterclockwise, and then turn the battery clockwise to increase the current.
2. BOOST boost structure, the minimum output voltage is approximately equal to the input voltage, so the output current cannot be set from 0, the minimum output current is approximately the input voltage divided by the load resistance value.
3. Module input IN- must not be short-circuited with output OUT-, otherwise the constant current function will fail.
4. Please make sure that the power of the power supply is always greater than the power required by the output load. Please reduce the power when the module is severely hot!
5. The USB output port is not a 5V output. It is directly connected to the output port. The maximum voltage can be adjusted to 30V. For example, to charge mobile phones and other digital products or compatible with your other valuable instruments, please verify the USB output voltage first. Any damage caused by us will be No guarantee, we only have the ability to pay for modules and freight. Please read the product description carefully before using it. Damage caused by improper use will not be compensated.
문서
-
Potentiometer/LED introduction:1>.CV Potentiometer:Adjust output voltage.Increase the output voltage when rotating clockwise.2>.CC Potentiometer:Adjust output current.Increase the output current when rotating clockwise.3>.CC LED:Red LED.Constant current output indicator.It enters the constant current state when the load current reaches the set current and CC constant current indicator turns ON.4>.ON LED:Green LED.Output voltage indicator.5.Protective function:1>.Under-voltage Protection:The default under-voltage protection voltage is 2V.User can modify the R22 resistor according to the formula R22=12500/(U-0.75V) and reset the under-voltage protection value.U is under-voltage protection value.E.g set under-voltage protection value to 3V.So the R22 needs to install 5.6K resistor.2>.Adjust output current:Rotate the CC potentiometer counterclockwise more than 20 turns before connect power supply.Then power on.Then rotate the CC potentiometer clockwise to increase the output current.6.Using Steps:1>.As a ordinary step down power module:1.1>.Connect right input voltage at input terminal;1.2>.Adjust CV constant voltage potentiometer to set output voltage according to require.1.3>.Rotate CC constant current potentiometer clockwise to set output current according to require overcurrent protection value.1.4>.Test and using(E.g:Module’s maximum output current is 2A if display 2A on multimeter.Red LED indicator will turn on if output reach to 2A.Otherwise LED is OFF.)1.5>.The output voltage will decrease due to the current sampling resistor at the output. The higher the current, the more the voltage is reduced.2>.As a charger:2.1>.Tops:Power module can not be used as charger module if it does not support constant current function.The voltage difference between the battery with insufficient voltage and the charger is very large.Causes excessive charging current even damage the battery.So it need keep charging in constant current mode to reaching a certain level.Then automatically switch back to constant voltage charging.2.2>.Make sure floating charge voltage and charge current for battery.If the lithium battery’s parameter is 3.7V/2200mAh, then the float charge voltage is 4.2V, and the maximum charging current is 1C, which is 2200mA.2.3>.Connect right input voltage at input terminal.(Note:Please don’t connect load during set parameter).2.4>.Test output voltage by multimeter and adjust CV potentiometer to make sure output voltage reach to require floating charge voltage.(If charge a 3.7V lithium battery, adjust the output voltage to 4.2V)2.5>.Rotate CC constant current potentiometer clockwise to set output current according to require charge current value.2.6>.Connect battery at output terminal and start to charging.3>.As a high power LED constant current driver:3.1>.Make sure LED working current and maximum working voltage.3.2>.Connect right input voltage at input terminal.(Note:Please don’t connect load during set parameter).3.3>.Test output voltage by multimeter at output terminal and adjust CV potentiometer to set output voltage to LED’s maximum working voltage.3.4>.Rotate CC constant current potentiometer clockwise to set output current according to require LED working current.3.5>.Connect LED and test.7.Note:1>.It is a step up power supply module,So the output voltage must be more than input voltage.Otherwise it will not working normally.2>.The USB output is not fixed at 5V,it maybe 1V~24V.So please careful when use USB!3>.Please rotate the CV potentiometer counterclockwise more than 20 turns if there is no output voltage.4>.It is a DC power module,So it can not connect to AC power.5>.’IN-’ and ‘OUT-’ can not be connect together,otherwise module can not support constant current output.6>.Please make sure input power is more than load power.7>.Please step down output power if module is hot.8>.Please read use manual and description before use.